Optics articles from occasional contributor Spencer Luster of LightWorks don’t come along very often, but they’re worth the wait. Here’s a great article on DIY pericentric imaging.
One of Light Works' main product lines is hypercentric (sometimes called pericentric) lenses that provide converging views. We offer high quality models for difficult and critical inspection tasks. Many times, however, the basic converging view geometry is of benefit, even with lesser image quality. With that in mind I'd like to quickly describe how you can set up such geometry with a conventional camera lens and a Fresnel lens.
Figure 1 shows a spool with defect examples such as a dent in the top flange, and a tear in the bottom. Wouldn't it be great if you could inspect both flanges simultaneously using one camera? Now you can! Order before midnight tonight! I mean, uh, just keep reading.
Figure 1
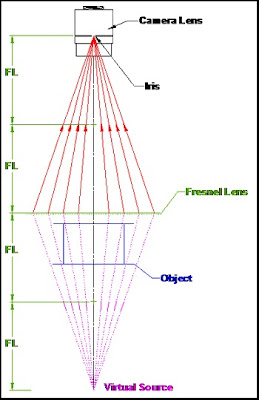
Figure 2 shows an arrangement of a combination of a camera lens and a Fresnel lens that makes up a hypercentric system.
Figure 2
Some things to note about this system are:
- The Fresnel Lens has a focal length FL.
- The Fresnel Lens is placed two FL distances away from the Iris of the Camera Lens. (You can estimate by eye the location of the Iris.)
- When the Iris is small – say F/8 or more – the Camera Lens will only accept light that appears to come from a small Virtual Source that is two FL distances below the Fresnel Lens.
The result of this system is a converging view of the object. (See the pink dashed lines.) By itself many fun and useful inspections can be achieved. Nevertheless, our goal was to inspect the top and bottom flanges. As shown, the bottom flange can be inspected, but the converging view of the top means it's "back lit" by the spool itself – it can't be silhouetted to spot the dent defect.
One easy solution is to cut a hole in the center of the thin, plastic Fresnel lens. Figure 3 shows this.
Figure 3
Now place a diffuse light source below the spool. The result? Pure optical magic! The bottom flange inspection hasn't changed, and the top flange is now properly back lit.
Okay, that's the Readers' Digest version. In practice there are a few things to keep in mind:
- Fresnel lenses are for imaging use in near monochromatic light only. Stick with single color LED illumination. Even then image quality will only be fair.
- Most Fresnel lenses are designed to have their grooved side facing a so-called "infinite conjugate." That is, the grooved side should be viewing something very far away, or receiving nearly collimated light. The smooth side should face a near object or the finite conjugate. Using a Fresnel as described above violates this principal, but you can still build a useful system. An improvement would be to use a pair of Fresnel lenses with their grooved sides facing each other.
- The distance from the Fresnel to the Camera Lens Iris doesn't have to be 2* FL, but it's a good starting point. Experiment with other distances.
- When illuminating the object, you may see light scattered from the Fresnel grooves. Try to prevent light traveling directly from the light source to the Fresnel surface.
Have fun!
Spencer Luster


No comments:
Post a Comment