Showing posts with label lighting. Show all posts

Tuesday, May 26, 2015

When you’re backlighting cylindrical parts


I see backlighting used all the time in machine vision training classes and at trade shows, typically for gauging or locating shapes. Look closely though and you’ll see the targets are flat objects – boxes, stamped parts – those kinds of things. Never machined steel shafts.

There’s a good reason for that. Unless you’re using a collimated backlight you won’t get a true image. That’s because the backlight emits light over 180 degrees, and some of those rays strike the target shaft and reflect in to the camera, as shown in this rather crude sketch.


This means you will see bright pixels in what should be dark areas of the image, and those can play havoc with your vision tools.

Interestingly, I observed this in a recent application note from National Instruments. “Developing a High-Speed, High-Accuracy Measuring System for Automotive Screw Inspection” includes some screenshots from the system. If you look closely at image 3 in the gallery you’ll see what I mean.

Now there are ways around this. The best is to use collimated light (where all the rays travel in the same direction,) but if you can’t do that use the smallest backlight possible and position it as far behind the target as possible. That way you’ll cut down on those tangential rays coming off the part and into the camera.

There is no charge for this snippet of advice. All I ask is that you keep coming back. If you’d like to link to this page, even better.

Sunday, May 5, 2013

Does LED size matter?


The machine vision industry is pretty small, so when it comes to developing new technology we tend to hang on to the coattails of the big boys. Lighting is a good example. I think I’m right in saying that no one is developing LEDs for machine vision. Instead, the vision lighting companies have to utilize what’s being churned out for the higher volume applications, like industrial and residential lighting.

These days it seems LED manufacturers are working on ever bigger LEDs, and many are finding their way in to machine vision lights, like the Monster series from Spectrum Illumination. The problem I have with these is that they are prone to creating hot spots. Interestingly, judging by the lens optics diagrams on their website, smartvisionlights has recognized this problem and tries to shape the light to reduce the problem.

Some engineers I work with take the view that a sufficiently thick diffuser is all that’s needed to smooth out the light, but in my view that wastes photons by reducing the total output. I would rather see a higher density of small LEDs, which is the approach taken by CCS in most of their lights. You might notice though that even they’ve jumped on the high intensity – big LED bandwagon.

Now I appreciate that mounting LEDs takes time, which it probably why CCS’s lights are among the more expensive, but I’ve also found the light they put out to be some of the most uniform. I guess you get what you pay for, and I’m willing to pay extra to get more even illumination from a higher quantity of lower output LEDs.

Tuesday, December 4, 2012

Lighting is job one


All those fancy vision tools in your favorite package, none of them inspect the objects passing down your conveyor. All they do is perform measurements on the image the camera acquired. So if the image is not a reliable representation of reality the results will be pretty meaningless.

You vision experts know what I’m driving at: the image is everything and it all starts with lighting that maximizes the signal to noise. In this case the signal is the features you want to detect or measure and the noise is all the other clutter.

We’ve learnt a lot about lighting over the years but sometimes it’s still good to be reminded of the basics, and it used to be that the best material on lighting came from Nerlite. Well Nerlite was absorbed into Microscan long ago, but their material still exists, and has recently been reissued in the pages of Assembly. The article title, “Eight Tips for Optimal Machine Vision Lighting” sums it up nicely.

Thursday, October 25, 2012

Industrial lights from Smart Vision Lights


At the risk of offending some manufacturers, not all machine vision lights are terribly robust. I find they often lack sturdy mounting points or heat sinks, and seem rather fragile. That’s when, when I saw the Prox Spot Lights from Smart Vision Lights I said, “Gosh, isn’t that a good idea.”

My favorites are the SA30 Series which come in a 30mm housing and have an adjustable spot size, thanks to a sliding outer barrel. There’s no need for a dedicated external power supply – just feed them 24V – and it’s even possible to vary the light output.

I’d suggest setting them up at 80%, so if their output drops off over a year or two there’s some space to crank ‘em up a bit. Assuming you know what intensity you actually need. ;-)

Monday, October 22, 2012

Directional light


Ah yes, lighting. The bane of our machine vision lives. One of the challenges we face is that what works for item A on our conveyor may not work so well for item B, even though they come off the same machines and travel down the same conveyor. So when designing a system we spend hours … make that days … trying to find an optimal solution.

How about just using different lights? When space allows, this can be an effective solution, but sometimes it’s not possible. In desperation I have even resorted to placing a mask over regions of my lights, thus Mask A for item A and so on.

But wouldn’t it be easier to have control over each LED?

The RL28Q and RL16Q from Oregon-based Orled (ORegon–LED?) go some way towards this illumination nirvana. These ring lights provide independent control over four quadrants, so you can chose to cast a shadow in a particular direction, for example. (Something that might help with detecting topographical defects, for example.

Now my impression is that these lights are really intended for use with microscopes, where a person viewing would switch quadrant as necessary. But I’m pretty sure that, with a little ingenuity, segment-switching could be automated for a machine vision application.

And that might make lighting just a tiddly bit easier.

Wednesday, September 19, 2012

Heat is the enemy


When LED lighting arrived on the machine vision scene, maybe a dozen years ago, the salesmen made all sorts of claims. LED lights, they told us, would last for 60,000 hours or more, their output would never drop, and they’d even make you, the buyer, more attractive to the opposite sex.

Well with the benefit of experience, we now know none of that is accurate. I can’t think of any LED installations that have lasted 60,000 hours, (that’s almost 7 years of 365 x 24 service.) I have found that light output diminishes – something especially evident when replacing one of a matched pair. (Note to self: always replace both lights.) And the only time an LED light increases my attractiveness is when it goes out and I’m plunged into darkness.

What’s gone wrong?

Drawing on my experience, I think the problem lies in our factory installations. I suspect that on the test bench the claims for LED lights are broadly true, but those conditions are far from what the lights see in a factory. Vibration and dust are both problems but I’m of the opinion that heat is the big killer.

As LEDs Magazine noted back in 2005, “…LED performance is measured yb [sic] the manufacturers under laboratory conditions, and is usually specified at a junction temperature of 25 °C, even though this is pretty much guaranteed to never occur in real situations.” And they added, “Most significantly, the junction temperature affects the lifetime of the LED.”

You may have noticed that some light manufacturers add pretty dramatic fins to their products in an effort to get rid of the excess heat, and I recall that a few years back a UK company introduced water cooled lights. Other producers use fans to improve airflow. But what they can’t control is how you install the light.

Five LED installation tips

  1. Use the biggest heatsink you can fit in the space available. I measured what this could do and found a reduction in temperature of about 4oC.
  2. Consider airflow: orient the fins of the heatsink so air can flow over them. That means vertically rather than horizontally.
  3. Build airflow into your vision enclosures. This doesn’t have to mean fans, just provide vents for the hot air to escape out the top.
  4. If in doubt, measure the ambient temperature around your lights. You may well be surprised how warm they can get at the end of a summer’s day.
  5. In extreme cases you might want to resort to some kind of chiller. Yes there’s a cost, but replacing LED lights is expensive too.

The bottom line

The tired old cliché tells us that lighting is the most important part of machine vision. Sure that means getting the geometry and wavelength right, but it also means keeping it stable and consistent. Paying attention to thermal issues can help you do that.

Sunday, July 22, 2012

Intriguing lighting configuration

A marketing email from camera-maker AVT included a link to German machine vision integrator Ziemann & Urban, so I followed the advice of Yogi Berra, (“When you come to a fork in the road, take it,) and clicked through to their website.

Good move, if I do say so myself. They have a ton of interesting application stories and videos to read and watch – clearly they know machine vision – but one I found especially interesting related to wheel inspection.

I’m not going to share the whole story – you’ll need to click through to “Automatic adjustment of wheel rims” for that – but I do want to share the photos of the lighting set up. (I don’t own the copyright but I’m hoping that Z&U will appreciate the free publicity I’m giving them.)

Now wheels are complicated things to image. They tend to be reflective and they have lots of complex geometry. I’ve seen massive cloudy day illuminators used for this kind of task but they tend to have a huge footprint. So let’s look at Z&U’s approach.

This first picture shows the camera surrounded by an array of linear LED lights. Separating the lights are aluminum baffles. I have to wonder if the baffles help create a kind of cloudy day effect.

The next picture shows the LED’s powered up. Interesting effect, don’t you think?

I’m not sure I can explain what’s going on, but if you look at the screen shots on Z&U’s website, it seems to work.

Thursday, July 19, 2012

A paradigm shift in lighting

It’s drummed in to us from the moment we first start learning about machine vision: lighting is the most important thing. So we spend the early feasibility stages of every project working out how to throw light onto the object we want images of.

What if we reversed that thinking? What if we could selectively turn light off to leave just the rays that are of value? Think of it as anti-light.

That’s my interpretation of work underway at Carnegie Mellon University. A team of researchers has been working on a familiar problem – poor visibility when driving in rain and snow. You know how the light from your headlights reflects back? Well they asked, what if we could turn off the light before it struck an individual raindrop or snowflake?

If you think that sounds far-fetched, take a look at “Toward a Smart Automotive Headlight for

Seeing Through Rain and Snow” on the CMU website.

This easy-to-follow, equation-free presentation shows how a high-speed camera and imaging software is used to determine the position, direction and speed of individual raindrops. Then, based on a prediction of where the drop is heading, the light that would fall on it, and reflect back to the motorist, is turned off.

It’s an intriguing idea and I can’t wait to see a machine vision entrepreneur pick it up and run with it. Imagine being able to turn off the individual LEDs that are causing glare in an image. Now that would be useful!

Tuesday, April 3, 2012

A better linescan light

I had the misfortune recently of watching an engineer set up a light for a linescan inspection system. If you’ve ever had to do this you’ll know that it’s far from easy. The angle of the light is critical to get the required contrast on the target, the working distance has to be right to minimize the line width and maximize the intensity, and the line has to align perfectly with the sensor in the camera. In short, there are just too many degrees of freedom.

This is what first drew me, like a moth, to the Corona II from German light and camera manufacturer, Chromasens. Instead of a rod lens, this uses a mirror to create the narrow focused line. And to make life easier for the integration engineer, the light has flat mounting surfaces with the mirror directing the beam out at a known and fixed angle.

As all you mechanical types will know, it’s much easier to construct mounting brackets and surfaces that are flat, square and parallel than at some complex angle, so this feature of the design seems a simple yet useful advance.

Another point I really like is the ability to control the output of the light automatically. Using what Chromasens call an ““Illumination Setup Tool” it’s possible to have the output altered in response to the image quality. This way the impact of dust on the light cover or reduced LED output (yes, it does happen,) is automatically compensated and the vision engineer gets fewer service calls in the middle of the night.

I doubt these lights are cheap, but this might be one of those cases where you spend more to save more. And that includes saving on installation time.

Monday, March 19, 2012

Remembering lessons from math class


It’s hard to believe now, but I was once pretty good at math. My test scores didn’t always show it though, because I would perform the algebra in my head and just write down the answer. Teachers, so Mr. Pearce of 10th Grade Math explained more than once, like to see your workings out.

The same applies to machine vision projects, and especially to lighting. On more than one occasion I’ve been asked to revisit an old project to make some changes. Oftentimes it’s because the product under inspection has changed in some way we didn’t anticipate, or someone has added another quality check. But whatever the reason for going back to an old system, I often find myself wondering why I did it that way.

My project files are seldom any real help. Yes I’ll have quotes for components, product specifications, mechanical drawings and so on, but if I want to know why I used a 9 inch ring light I’m stumped.

There is an answer to this. Now, when I’m performing a lighting feasibility study – what I once heard called “poke and hope” – I write lots of notes and save plenty of images. This way I have a full history of what I tried, how it worked out, and what I did next.

Yes it seems a bit laborious, and it takes some discipline because notes have to written up immediately, but, as I found on a recent system upgrade, I have a complete history of how I arrived at the solution that was implemented.

In short then, I now show my workings out – Mr. Pearce would be proud of me – and as I’ve just found, it saves me time.

Wednesday, December 7, 2011

LED lighting – not as stable as we’re told?


It’s probably ten years since LED’s started to make real inroads in the machine vision world. Up until that point we’d all used fluorescent and halogen lighting, but LED’s, so we were assured, were stable and long-lasting.

Turns out, that’s not strictly accurate. Yes, LED’s make a great light source, but they are not perfect. More specifically, heat is their great enemy. As an LED warms up its output drops. Not a lot, but perhaps enough to alter a critical measurement.

What’s the answer? Well CCS has a few tips on their website, under the heading of “Skillful use of LED lights.” Take a look and pick up a few ideas for your next project.

Tuesday, November 22, 2011

How to evaluate machine vision lights


Go to a vision show and you’ll find any number of vendors showing off LED lighting. They’ll have red lights, blue lights, green lights, (not so many IR lights though – I wonder why?) and all sorts of geometries: backlights, darkfield ring lights, line lights and so on. Then, as you get into discussion with the sales guy you’ll learn that prices range from the somewhat expensive to the Oh-My-God-that’s-more-than-the-profit-we-reported-last-year. So how do you decide what represents good value?

The main criteria should be how well the light illuminates the object or area your vision system will be looking at. The problem I have though, is that without specialized equipment it’s virtually impossible to quantify uniformity of light distribution, or indeed, the spectral distribution.

So here are my guidelines:

  • Hold the light in your hand, (with it turned on – duh!) If it feels really hot, that’s a bad sign. Heat is the enemy of LED’s.
  • Examine the mechanical assembly. Is it rigid? Does it have good mounting points? Will it endure years of vibration? Can it be cleaned easily?
  • Study the LED placement. How uniform is the pitch? The height? Are any pointing off-axis?
  • While it’s difficult to assess uniformity, I prefer to see more small LED’s rather than a few honkin’ big ones. This tends to reduce the incidence of hot-spots.
  • And finally, value. While it’s a somewhat sweeping assumption, I tend to believe power consumption correlates with light output. So work out the price per watt. What this might show is that the differential between the cheap and the expensive light is not as great as it appears at first.
Obviously, none of this is as good as objective measurement of light output. But unless you’re going to buy a whole lab of test gear, I suggest these checks will help in determining which LED lights offer the best value for money.

Last, a quick note to my readers outside the US: this Thursday is Thanksgiving, so I'll be taking a break for a few days. Check back after the weekend!

Wednesday, November 9, 2011

Challenging the paradigm


Every new entrant to the wonderful world of industrial machine vision is told the same thing: it all begins with lighting. Get the lighting right and everything will be straightforward. And historically speaking, that’s been true. Consistent illumination that creates contrast in the features you want to see makes it possible to apply standard vision tools, principally edge detection and blob analysis.

Now, think back to those two video analytics posts I made previously, Does lighting matter? and In-car video analytics. What do they have in common? No control over the lighting.

It was Mitch Rohde, CEO of Quantum Signal, who forced me to think about this. Back in the day when crude presence-absence systems first emerged, lighting was critical. But today we have so much number-crunching capacity available that perhaps we should think differently. Perhaps we should learn from our video analytics colleagues and extract information from video streams without worrying too much about the lighting and optics.

Can we disregard them completely? No, but should we continue investing time and effort in optimizing light direction, intensity and wavelength when maybe raw computing power can do it all for us? Perhaps it’s time to rethink this paradigm.

Monday, November 7, 2011

Does lighting matter?


The key to machine vision success is lighting, or so the experts tell us. But what if the experts are wrong? What if lighting is irrelevant to the success or failure of our applications?

Heresy? Perhaps, but I recently had the opportunity to listen to an image processing guru who argues our whole machine vision paradigm is wrong. And I think he may have a point.

Let’s start with video analytics – the business of extracting information from the torrent of data that is a video stream. Today I’m going to introduce you to video analytics in retail. My next post will cover the same technology in automotive applications, and then I’ll attempt to challenge our assumptions about how to “do” machine vision.

Intrigued? Then keep reading.

Lighthaus is a leader in retail video analytics. Their products will track people in a store and provide managers, layout planners and so on with information about which areas get the highest traffic, how long they loiter, and so on. They claim, and I will admit to finding this a little hard to swallow, that their technology can even estimate the age and gender of visitors to a store. That’s something I struggle with, despite my advanced processing capabilities and years of accumulated knowledge, so I imagine there’s a pretty high margin of error.

If you spend some time on the Lighthaus website you’ll find a number of movies showing their systems in operation. It’s impressive stuff, and despite my skepticism regarding some of their claims, I think you’d have to agree that it works. In my next post we’ll take a look at the same technology in the automotive world.

Monday, October 31, 2011

Scandinavian machine vision lighting


I’ve only been to Scandinavia once: the people were warm and friendly, the beer was fantastic, the weather was a bit ho-hum, but what really hit me were the prices! That is an expensive part of the world!

I wonder if that applies to lighting products from LATAB?

As with everything that comes out of Sweden, (Volvo, Abba, pickled herring – or is that Norway?) they look fantastic, but I have a feeling they will be a wee bit expensive. That said, the machine vision lighting business is pretty competitive, so perhaps I’m being unduly harsh. If you want to do some comparison shopping you could do worse than talk to these guys.

Let me know what you think.

Monday, September 5, 2011

The influence of heat on LED lighting


LED lighting is pretty much ubiquitous in machine vision these days, and for good reason: LED’s last forever and they’re totally stable.

Well that’s what we’ve been told, but it’s not completely correct. Yes, LED lighting is superior to fluorescent in that it’s a monochromatic source that shows very little intensity reduction with age, but it is vulnerable to the effects of heat.

Perhaps the biggest issue with LED’s is the risk of thermal runaway – they draw more power as they get hotter until they go bang (well actually they just die, but you get my point.) This is why it’s so important to use a current driver with LED lighting, and it’s also advisable to provide a big heat sink. But there are a couple of other issues too.

As noted in LED’s Magazine, light output reduces as temperature rises – another good reason for a big-assed heat sink – but what I find really interesting is that this effect is related to the wavelength of the LED itself. Specifically, red LED’s are much more temperature sensitive than are the blue ones. An argument for using blue or green lighting rather than red?

A second issue, noted in the LEDs Magazine article and reiterated on The Bergquist Company website, is that the wavelength of the emitted light is influenced by temperature. In fact LEDs Magazine notes an increase of as much as 0.13nm per degree C. Okay, in a factory environment that might mean a shift of only 2nm, but that could be enough to reduce the number of photons getting through a bandpass filter to your CCD.

So what to do? Well don’t give up on LED lighting: it’s the best we’ve got. Just be conscious that temperature can be a problem. I suggest good heat sinks and airflow are the way to build robustness into your vision system.

Sunday, August 21, 2011

Telecentric Lenses with Collimated Light: Part IV, Collimated Dark.

[Note to readers: Here’s the final installment in a series of four posts by Guest Blogger Spencer Luster. Spencer runs a business that specializes in telecentric imaging, and if you don’t know what that is, I suggest you read his articles and visit his web site, www.lw4u.com.]

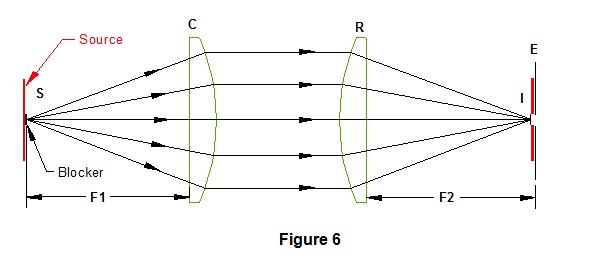
In Part I we explored using telecentric lenses and collimated lighting for subtle defect detection. We then moved on to alignment and adjustment issues. Now we're ready to take a look at a powerful technique for detecting very subtle defects—Collimated Dark. Figure 6 shows such an arrangement.

This is the same as for the collimated light set-up, but the source (S) is much larger, and a blocker has been added on-axis. The blocker size is chosen so that its image just fills the entrance pupil (E) of the telecentric lens. It's as if a "dark source" is emitting "darkons" or "dark rays" toward the telecentric lens. Of course what's really happening is that light from the source is being projected by C in many, many directions except parallel to the optical axis. Drawing all those light rays, however, would just make a mess, so it's handy to think of dark rays. But remember, lack of dark rays equals light.

When no object is between C and R, or it's just a flat, smooth, transparent object, the dark rays are unchanged and enter the telecentric lens. When a defect deviates a dark ray, however, light enters the lens and a bright signal is produced.

Like most dark field techniques, the otherwise unused source can be made extremely bright and thus produce a highly sensitive system. Why? Suppose a defect in a light field system has a "natural" contrast of 1%. A background of 200 grey levels will only be changed by 2 grey levels for such a defect. Tough to detect. A dark field system, however, could have a source with a theoretical light level of 2,000 grey levels, or 20,000 grey levels. With no defect there is no signal, but if the 1% defect appears, the signal spikes to 20 or 200 grey levels!

Remember the images of the safety glasses from Part I? Let's take a look at exactly the same object, but this time using collimated dark and a very bright source.


Figure 7: Collimated Dark

Now we see the curved "viscous thread" defect showing up as a bright object because it refracts the dark rays away from the telecentric lens. Furthermore, every little dust speck, and even the long hair that was deliberately placed appears bright with high contrast. Why should such a dark, blocking object show up as bright? The answer is diffraction. We won't go into details here, but the edges of any object deviate rays slightly and produce a weak signal. When the source is very bright, even a weak signal can easily be detected.

Spencer Luster
LIGHT WORKS, LLC

Wednesday, August 17, 2011

Dealing with uneven illumination


We all know the importance of getting the lighting righting, don’t we? Much easier than fixing a bad image in software. But let’s be honest, sometimes it’s necessary to throw idealism out the window and adopt a more pragmatic approach.

Just such a scenario is described in “Software compensates for lighting nonuniformity in solar cell inspection” (Vision Systems Design, August 4th, 2011.) This describes a vision application where, for various reasons, it wasn’t possible to make the lighting perfect. Instead, developer Owens Design, out of Fremont, California, implemented a very simple trick to smooth out uneven lighting. When you read the article, you’ll probably agree that while it’s not rocket science, it is a very simple, and very neat, idea.

Okay, I’ll cut to the chase. The trick involves image arithmetic: the process of performing a mathematical operation on two images to produce a third. Now it’s not completely clear from the article which mathematical operator was used – addition, subtraction, absolute difference – but you could figure that out for yourself. The point is, image arithmetic is an oft-overlooked tool for improving contrast.

Before I go, a quick side note: one issue I have encountered with arithmetic operations is what happens when the sum exceeds 255 (or a difference is less than zero.) Different packages seem to handle this in different ways, so you’ll want to experiment to see what works best for you.

Tuesday, July 19, 2011

Lighting tips


There are times when each of us struggles to create good contrast in our vision applications, so as a public service I’d like to share “Eight Tips for Optimal Machine Vision Lighting.” The tips are from Microscan and the article was published on the Quality Digest website, July 11th, 2011.

The tips provided are all good, and they may well help inspire you, but I think their history or origin is also interesting. Those of you who’ve been around vision systems for a few years will recognize these as the same tips that NER used to offer. That shouldn’t be too surprising because NER was purchased by Microscan some time ago.

I wasn’t quite sure about the logic behind the acquisition, and for some time the lighting products seemed to languish, with no Champion to promote them in the vision marketplace. Perhaps this recent bit of PR is a sign that Microscan lighting is beginning to stir. That has to mean competition for Advanced Illumination, CCS and the other players, and competition is always good.

Thursday, July 7, 2011

Wise words on lighting

The machine vision and inspection supplement published in Test & Measurement magazine is usually quite informative, but the June 2011 issue has a Q&A that I just have to share with you.

The “victim” of the interrogation is Dan Holste, Director of Engineering at Banner, and the title of the piece is “When vision is the best choice.” Dan starts by discussing how a vision system is just another sensing technology, but one with the ability to characterize an area rather than being a single point sensor like a photoelectric sensor. Where it gets really interesting though is when Dan is asked “How does vision sensing give more information?”

His answer is that lighting is 90% of the equation. Dan goes on to say that the goal should be to create contrast between what you want to see and what you don’t care about.H

I think most of us know that, but how much effort do we put in to lighting studies? If I’m honest, I know I could do more to investigate different options. I could probably make more use of polarization, to give one example, and I should perhaps spend more time exploring the impact of wavelength on my images. But there’s never as much time as we’d like and I admit that sometimes I take the view that its good enough and I’ll do the rest in software. But how long does that take?

Dan offers some wise words. Read them and heed them.